Arma2NETMySQLPlugin’s documentation
Introduction
Links:
- Arma2NETMySQLPlugin Github Page
- Arma2NETMySQLPlugin BIS Forums Thread
- Arma 2 Example Mission
- Arma 3 Example Mission
This plugin acts as an intermediary between Arma2/Arma3 and a MySQL or SQLite database. It uses the Arma2NET wrapper system. It is written in C#. The program has to be run on the same system as your Arma2/Arma3 server, however, the MySQL database can be either local or remote. The SQLite database runs on the local machine.
Please read this entire document as it has many important details regarding the installation and setup.
History
This program has had a long history. Initially, the program used JayArma2Lib because DLL injections were the only way to pass information between Arma2 and the outside. Eventually, BIS added CallExtension which allows for a more structured (non-hacky) way to pass information. JayArma2Lib switched to using CallExtension and things continued. Development of a program that used JayArma2Lib to connect to MySQL was done here and an example mission was created.
Technically, all that code should still work but the bad part was all the formatting and ugly stuff that had to be done in game via SQF scripting in order to get the data into a reasonable format. It involved iterating through strings and creating arrays and generally was pretty hacky.
Then, Arma2NET came along and things got much easier. This wrapper system allows us to return nice results back to Arma2/Arma3 without having to deal with all the formatting nonsense.
The end result is a plugin for Arma2NET called Arma2NETMySQLPlugin. Development of this plugin is done via Github.
There are a wide variety of projects that currently use this plugin to save data.
- Persistent Database Scripts (not currently maintained or updated) created by [KH]JMan and others
- MSO (modular mission framework)
- Altis Life RPG
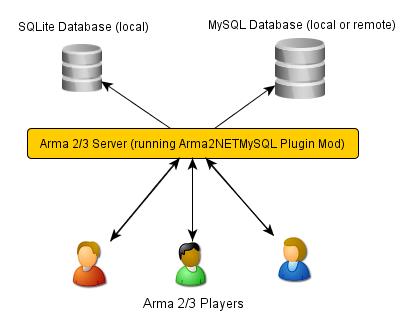
Arma2NET and this plugin are only required on your Arma2/Arma3 server. They are not needed client-side.
Requirements
To run the plugin:
You need a Windows server. (see Known Issues)
One of the following:
Install both of the following dependencies (even if you are only using MySQL or SQLite individually):
Warning
If you are using a precompiled version of this plugin, you will need to use the specific version of the connectors for MySQL and SQLite listed below. The precompiled version of the plugin will not work with any other version. I will attempt to keep the precompiled version relatively up-to-date. Alternatively, you can compile the plugin yourself on Windows if you have Visual Studio. See the section For Developers for more details on this.
Note
Successfully tested with version 6.7.4 (mysql-connector-net-6.7.4.msi)
Note
Successfully tested with version 1.0.89.0 (sqlite-netFx40-setup-bundle-x86-2010-1.0.89.0.exe)
Arma 2 or Arma 3
Arma2OA Beta version 87640 or later (full client or dedicated server)
- See the following ticket for a note about Windows dedicated servers and required files. I would recommend running whatever Arma 2 beta version is the latest.
Arma 3 (all versions supported)
Arma2NET, this should already be included if you downloaded a compiled version of this plugin.
Installation and Setup
Copy Files and Setup Folder Structure
Arma2NETMySQL looks two places for the relevant files and folders. First, it checks the Arma2/Arma3 root directory. If it can’t find them there, it looks in the AppData folder. I would recommend using the AppData location if possible. This makes future upgrades and changes easier to manage. However, some people on limited rental servers may need to put them in the root Arma2/Arma3 folder. Make sure the file/folder structure matches one of these.
Warning
Don’t put some files in one location and some in the other, that could result in problems.
This is just an example location for Arma 2, you’ll have to figure out where your Arma2/Arma3 game folder is.
E:\Program Files\Steam\steamapps\common\arma 2 operation arrowhead\
E:\Program Files\Steam\steamapps\common\arma 2 operation arrowhead\Databases.txt
E:\Program Files\Steam\steamapps\common\arma 2 operation arrowhead\sqlite\
E:\Program Files\Steam\steamapps\common\arma 2 operation arrowhead\logs\
C:\Users\Yourname\AppData\Local\Arma2NETMySQL\
C:\Users\Yourname\AppData\Local\Arma2NETMySQL\Databases.txt
C:\Users\Yourname\AppData\Local\Arma2NETMySQL\sqlite\
C:\Users\Yourname\AppData\Local\Arma2NETMySQL\logs\
This location is for Windows 7/Vista. If you’re running an older version of Windows, this location will probably be different.
The folder structure for Arma2NET should look like the following. Note that if you downloaded a compiled version of the plugin, this should already be included and setup correctly.
This is just an example location for Arma 2, you’ll have to figure out where your Arma2/Arma3 game folder is.
E:\Program Files\Steam\steamapps\common\arma 2 operation arrowhead\@Arma2NET\
E:\Program Files\Steam\steamapps\common\arma 2 operation arrowhead\@Arma2NET\Addins\
E:\Program Files\Steam\steamapps\common\arma 2 operation arrowhead\@Arma2NET\AddIns\Arma2NETMySQLPlugin\
E:\Program Files\Steam\steamapps\common\arma 2 operation arrowhead\@Arma2NET\AddIns\Arma2NETMySQLPlugin\Arma2NETMySQLPlugin.dll
E:\Program Files\Steam\steamapps\common\arma 2 operation arrowhead\@Arma2NET\AddIns\Arma2NETMySQLPlugin\MySql.Data.dll
E:\Program Files\Steam\steamapps\common\arma 2 operation arrowhead\@Arma2NET\AddIns\Arma2NETMySQLPlugin\System.Data.SQLite.dll
Setup the Databases.txt File
Edit the Databases.txt file. This file requires separate lines for each database (even if they’re on the same host). Any line that starts with a pound/hash sign “#” is considered a comment.
Warning
This database text file stores usernames and passwords in plaintext. Be very careful about who has access to this! In addition, Arma2NETMySQL does not limit the actions that can be performed on the database. For security reasons, create a username that is locked down and only has access to a single database. We strongly recommend NOT connecting to the database as the root user. This is generally a really bad choice because this user has full access. We will not be responsible if something gets deleted! Please note that there are no checks for SQL injection attacks so be extremely careful about how you allow users to input information that will run against the database.
Put the Databases.txt file in the appropriate location given the folder structure that you decided on above.
Setup @Arma2NET Mod
Next you will need to setup @Arma2NET as a mod and start Arma2/Arma3. Simply add the mod when you start the game. For example your command line parameters (for the server which connects to the database) might look like this:
1 | -mod=expansion\beta;expansion\beta\expansion;@Arma2NET
|
See the Arma 2 startup parameters or Arma 3 startup parameters pages for more details.
This plugin doesn’t require any other third party mods like ACE or CBA. But, they do have some nice utility functions and features that may be helpful when you make your missions.
Arma2/Arma3 player clients do not need to do any of this. This plugin runs serverside. The players will interact with the Arma2/Arma3 server. Through SQF scripting the information is passed from the database back to the players. This makes it easy on the players because there are no special mods that they need to install.
Using the Plugin
Connecting to MySQL
There are two ways to run MySQL queries with this plugin. One is using MySQL stored procedures and the other is just to use straight SQL queries.
MySQL Stored Procedures
Setup a MySQL database and create some stored procedures to use. For information regarding permissions required to create and execute stored procedures, see this MySQL guide.
MySQL stored procedures are essentially just stored commands that run. If you know basic SQL commands (SELECT, INSERT, UPDATE, etc.) you should be fine. These stored procedures can optionally have parameters that are passed which can then be used in the procedure.
There are a wide variety of tutorials regarding MySQL stored procedures but the best one I’ve found so far with nice examples are these:
The related tutorials links on the bottom of the page are also in the same series.
Your SQF code will look something like this:
1 2 3 4 5 | _strCreate = format ["[u=%1,n=%2,a=%3,b=%4,c=%5,d=%6,e=%7]", _allWeapons select 0, _loadoutName, _allWeapons select 1,
_allWeapons select 2, _allWeapons select 3,
_allWeapons select 4, _allWeapons select 5];
_create = "Arma2Net.Unmanaged" callExtension format ["Arma2NETMySQL ['weapons', 'CreateNewLoadOut', '%1']", _strCreate];
|
In this example, “weapons” is the database name. “CreateNewLoadOut” is the MySQL stored procedure. The parameters as part of the procedure are formatted and then passed along as the third argument.
Straight MySQL Queries
This is similar to what you’re probably used to. Commands like:
1 | SELECT * FROM table WHERE name = 'user'
|
There are two ways to run SQL queries. The first way is a little simpler and easier on the SQF scripting side. It uses the command Arma2NETMySQLCommand and will block until a result is returned. The other way is to use the command Arma2NETMySQLCommandAsync which is better for servers that will heavily utilize this plugin and have a significant number of players. This will return null immediately upon calling it because it’s an asynchronous call. You will then need to loop and continue calling it until you get the result back. If you are fairly proficient with SQF, I would recommend the second option.
- Arma2NETMySQLCommand
Your SQF code will look something like this:
1 | _selectTest = "Arma2Net.Unmanaged" callExtension "Arma2NETMySQLCommand ['weapons', 'SELECT * FROM users LIMIT 3']";
|
In this example, “weapons” is the database name. The next portion is the entire SQL query which you will need to create manually. This will block until the database call is complete and the result is returned.
- Arma2NETMySQLCommandAsync
Your SQF code will look something like this:
1 2 3 4 5 6 7 8 | _selectTest = nil;
while {isNil("_selectTest")} do {
_selectTest = "Arma2Net.Unmanaged" callExtension "Arma2NETMySQLCommandAsync ['weapons', 'SELECT * FROM users LIMIT 3']";
if (_selectTest == "") then {
_selectTest = nil;
};
sleep 0.5; //sleep for a half-second so we don't thrash the server with callExtension calls
};
|
In this example, “weapons” is the database name. The next portion is the entire SQL query which you will need to create manually. You will then need to loop until the result is returned.
Connecting to SQLite
There is one way to run SQLite queries with this plugin.
SQLite Database Setup
Databases need to be in your root Arma2/Arma3 folder or the appdata sqlite folder. See the above notes on Installation and Setup for details.
SQLite databases are just a single file that have .sqlite as a file ending. This file stores the database structure as well as the data.
Here is an example SQLite database location using appdata:
C:\Users\Yourname\AppData\Local\Arma2NETMySQL\sqlite\weapons.sqlite
Make sure your database name matches the name in the Databases.txt file (minus the .sqlite ending).
If you need a client for creating and managing SQLite databases, there is a nice SQLite Firefox plugin that works well.
SQLite Queries
This is similar to what you’re probably used to. Commands like:
1 | SELECT * FROM table WHERE name = 'user'
|
There are two ways to run SQL queries. The first way is a little simpler and easier on the SQF scripting side. It uses the command Arma2NETMySQLCommand and will block until a result is returned. The other way is to use the command Arma2NETMySQLCommandAsync which is better for servers that will heavily utilize this plugin and have significant numbers of players. This will return null immediately upon calling it because it’s an asynchronous call. You will then need to loop and continue calling it until you get the result back. If you are fairly proficient with SQF, I would recommend the second option.
- Arma2NETMySQLCommand
Your SQF code will look something like this:
1 | _selectTest = "Arma2Net.Unmanaged" callExtension "Arma2NETMySQLCommand ['weapons', 'SELECT * FROM users LIMIT 3']";
|
In this example, “weapons” is the database name. The next portion is the entire SQL query which you will need to create manually. This will block until the database call is complete and the result is returned.
- Arma2NETMySQLCommandAsync
Your SQF will look something like this:
1 2 3 4 5 6 7 8 | _selectTest = nil;
while {isNil("_selectTest")} do {
_selectTest = "Arma2Net.Unmanaged" callExtension "Arma2NETMySQLCommandAsync ['weapons', 'SELECT * FROM users LIMIT 3']";
if (_selectTest == "") then {
_selectTest = nil;
};
sleep 0.5; //sleep for a half-second so we don't thrash the server with callExtension calls
};
|
In this example, “weapons” is the database name. The next portion is the entire SQL query which you will need to create manually. You will then need to loop until the result is returned.
Load a Mission
You can use the instructions listed above to create your own missions. There are two missions provided as examples, one for Arma2 and one for Arma3. The example mission has a simple crate and GUI interface for loading and saving weapon/kit loadouts into a MySQL or SQLite database. This is a good place to start if you are a mission maker.
Known Issues
Note
Arma2NETMySQLPlugin uses the CallExtension function, however, there are some technical considerations as part of this.
Returning results via callExtension in Arma 2 beta 97299 (or higher) or Arma 3 has a limit of 16383 (~16 KB) characters. If you try to run a query that will return a result longer than 16383 characters, it will return the string “TooLong”. Then you know you will need to limit the number of results that are returned. You can use the MySQL Limit parameter and SQLite Limit parameter to limit the number of returned entries.
This CallExtension limit is part of the Arma2/Arma3 game engine so I don’t have any control over changing it.
Note
Currently, commas cannot be used as data to be sent back and forth because the system uses commas to identify splitting up the database columns. If you have a suggestion for how to solve this or would like to submit a fix, I would certainly appreciate it.
Note
The CallExtension method will block on the server until a result is returned. Some people were reporting problems when running this plugin on servers with lots of players and running many database calls. This was lagging the server and causing players issues.
If you are doing this and using Arma2NETMySQLCommand and need super high performance, consider switching over to the asynchronous method of using Arma2NETMySQLCommandAsync. After switching to this, server administrators have reported running high numbers of queries with many players with significantly less lag.
Troubleshooting
Stuck? First check the Arma2NETMySQL log files.
E:\Program Files\Steam\steamapps\common\arma 2 operation arrowhead\logs\
C:\Users\Yourname\AppData\Local\Arma2NETMySQL\logs\
The plugin creates a new log file each time it’s run.
If you don’t have a logs folder or it’s empty, this is a sign the plugin isn’t running and Arma2NET could not load it.
Arma2NET has log files here:
C:\Users\Yourname\AppData\Local\Arma2NET\
This will tell you if the plugin is loading appropriately. If it’s not, check your Arma2/Arma3 launcher and make sure that is all correct.
Lastly you can check the Arma2/Arma3 RPT log file.
C:\Users\Yourname\AppData\Local\{ArmA 2 OA\Arma 3}
These can get very long so scroll all the way to the bottom to see the latest run. This will tell you if you have an error in your SQF scripting code or other such problems. Note, these path locations are for Windows 7 (and Vista?) and may be different for other versions of Windows.
Note
Windows 7 (and other Windows versions?) can sometimes block DLLs from running. If you right click the .dll and click on properties at the bottom of the list there is a security tab. For the precompiled DLL, it knows the DLL came from another computer and thus doesn’t trust it. You’ll need to enable the DLL to run. If you are not comfortable with this, you can always compile the source code and generate the DLL yourself.
Note
This is the most common problem that people have. This plugin requires both the MySQL and SQLite C# connector libraries to be installed. The plugin then references the appropriate .DLL files. If you look in the log files and see something like “Fatal unhandled exception of type System.IO.FileNotFoundException” this means that it can’t find one of the dependencies. As mentioned above, make sure to install the specific version that this plugin was compiled against otherwise it won’t work.
Note
If you are getting a returned result of “Error” in the game, this probably means there’s something wrong with your query. Check the logs to track down the problem.
If you’re still having problems, please go back and double check that you did everything correctly. If you skipped a step or got an error and just decided to continue to the next step, nothing will work.
If you found a bug in the plugin, please create an issue ticket on the Github issues page.
If you’re still stuck, please post on the Arma2NETMySQLPlugin BIS Forums Thread. The forums are preferred over emailing me because the question and answer are available to future people who have similar problems. If you post any questions anywhere, please post ALL log files, otherwise we will have problems helping you.
For Developers
To examine the sourcecode, open up the provided Visual Studio project. To compile the code into a .DLL check to make sure the references are pointing to the correct place.
MySql.Data needs to be listed in the references and should point to “MySql.Data.dll” which is provided by the MySQL Connector listed above. System.Data.SQLite should point to “System.Data.SQLite.dll” which is provided by the SQLite precompiled binaries listed above.
Once these are set, you can compile the sourcecode. The resulting .DLL should be placed in the Arma2NET Addins folder here: @Arma2NETAddInsArma2NETMySQLPlugin. Each plugin is stored in a folder with the name of the DLL. Any dependency DLLs can also be placed in this folder as well.
For easy testing, you can use Arma2NetExplorer.exe provided by Arma2NET. After launching this program, click “list addins” to see if Arma2NETMySQL loaded in correctly. Then you can run straight commands as outlined in the above documentation.
For example:
1 | Arma2NETMySQLCommand ['weapons', 'SELECT * FROM users LIMIT 3']
|
If the Databases.txt file and your database is setup correctly, you can run queries here and see the result. This is extremely helpful for testing without having to load up Arma2/Arma3.
Make sure if you make a change to the C# code that you recompile and copy over the .DLL to the appropriate folder, otherwise you’ll be running the old version and won’t see any changes.
Changelog
Version 1.0 beta
- Currently in testing
Translations
All translations of this readme to other languages besides English are provided by the community. I take no responsibility for the accuracy of the translations.
If you would like to contribute translations, I would really appreciate it!
How To Contribute Translations
This readme uses the Sphinx Documentation system. It uses a simple markdown format. Some of the translation strings have markdown inside the string so make sure to keep that intact.
We use .po/.pot files and gettext for translating strings.
The easiest option is to do the translations right in your web browser. You can join the Poeditor website and start right now.
The second option is to fork the project on the Arma2NETMySQLPlugin Github Page and use an editor for the .po files and create the translations.
The .po files can be found here:
Arma2NETMySQLPlugin/documentation/source/locale/
The base .pot file can be found here:
Arma2NETMySQLPlugin/documentation/build/locale/index.pot
An excellent cross-platform editor for .po files is Poedit. Then, submit a pull request and I will merge them in. See the Poedit Wikipedia page and Gettext Wikipedia page for more details.
If you have any questions about translations, please ask on the Arma2NETMySQLPlugin BIS Forums Thread.
License
Arma2NETMySQL is licensed under the GPL version 3 (see license.txt).
If you would like to contribute code or fixes, please fork the project on Github and submit a pull request.
Thanks To
- Scott_NZ for Arma2NET
- Hatchet, Robalo, Buehgler and all the guys over at AlphaSquad
- JMan at Kellys Heroes
- All the testers
- All the translators
- Bohemia Interactive